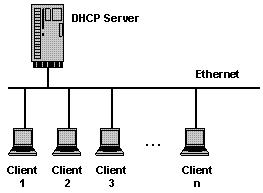
A DHCP Server assigns IP addresses to client computers. This is very often used in enterprise networks to reduce configuration efforts. All IP addresses of all computers are stored in a database that resides on a server machine.
Replace eth0 above with the name of your network interface that you want the server to lease addresses on.
From the above file you need to configure bold options and change domain name where it says yourdomainname.com
Orginal Article
A DHCP server can provide configuration settings using two methods
Address Pool
This method entails defining a pool (sometimes also called a range or scope) of IP addresses from which DHCP clients are supplied their configuration properties dynamically and on a fist come first serve basis. When a DHCP client is no longer on the network for a specified period, the configuration is expired and released back to the address pool for use by other DHCP Clients.
MAC Address
This method entails using DHCP to identify the unique hardware address of each network card connected to the network and then continually supplying a constant configuration each time the DHCP client makes a request to the DHCP server using that network device.
Install DHCP server in ubuntu 12.04
In ubuntu 12.04 ISC DHCP server is a transitional package for dhcp3-server so you have to install the following package
sudo apt-get install isc-dhcp-server
There are two main files /etc/default/isc-dhcp-server and /etc/dhcp/dhcpd.conf which we will need to configure so lets take the first.
Configuration of DHCP server
First you need to configure /etc/default/isc-dhcp-server file so you need to edit the file using the following command
sudo vi /etc/default/isc-dhcp-server
You should see similar to the following
#Defaults for dhcp initscript
#sourced by /etc/init.d/dhcp
#installed at /etc/default/isc-dhcp-server by the maintainer scripts
#
#This is a POSIX shell fragment
#
#On what interfaces should the DHCP server (dhcpd) serve DHCP requests?
#Separate multiple interfaces with spaces, e.g. “eth0 eth1?.
INTERFACES=”eth0?
#sourced by /etc/init.d/dhcp
#installed at /etc/default/isc-dhcp-server by the maintainer scripts
#
#This is a POSIX shell fragment
#
#On what interfaces should the DHCP server (dhcpd) serve DHCP requests?
#Separate multiple interfaces with spaces, e.g. “eth0 eth1?.
INTERFACES=”eth0?
Replace eth0 above with the name of your network interface that you want the server to lease addresses on.
Save and exit the file
Now you need to configure /etc/dhcp/dhcpd.conf file for this edit this file using the following command
sudo vi /etc/dhcp/dhcpd.conf
Once it opens you should see similar to the following
#
#Sample configuration file for ISC dhcpd for Debian
#
#Attention: If /etc/ltsp/dhcpd.conf exists, that will be used as
#configuration file instead of this file.
#
#
#The ddns-updates-style parameter controls whether or not the server will
#attempt to do a DNS update when a lease is confirmed. We default to the
#behavior of the version 2 packages (‘none’, since DHCP v2 didn’t
#have support for DDNS.)
ddns-update-style none;
#option definitions common to all supported networks…
option domain-name-servers ns1.example.org, ns2.example.org;
option domain-name “yourdomainname.com”;
default-lease-time 600;
max-lease-time 7200;
#If this DHCP server is the official DHCP server for the local
#network, the authoritative directive should be uncommented.
#authoritative;
#Use this to send dhcp log messages to a different log file (you also
#have to hack syslog.conf to complete the redirection).
log-facility local7;
#No service will be given on this subnet, but declaring it helps the
#DHCP server to understand the network topology.
#subnet10.152.187.0 netmask 255.255.255.0 {
#}
#This is a very basic subnet declaration.
subnet 10.0.0.0 netmask 255.255.255.0 {
range 10.0.0.150 10.0.0.253;
option routers 10.0.0.2;
option subnet-mask 255.255.255.0;
option broadcast-address 10.0.0.254;
option domain-name-servers 10.0.0.1, 10.0.0.2;
option ntp-servers 10.0.0.1;
option netbios-name-servers 10.0.0.1;
option netbios-node-type 8;
}
#option routers rtr-239-0-1.example.org, rtr-239-0-2.example.org;
#}
#This declaration allows BOOTP clients to get dynamic addresses,
#which we don’t really recommend.
#subnet 10.254.239.32 netmask 255.255.255.224 {
#range dynamic-bootp 10.254.239.40 10.254.239.60;
#option broadcast-address 10.254.239.31;
#option routers rtr-239-32-1.example.org;
#}
#A slightly different configuration for an internal subnet.
#subnet 10.5.5.0 netmask 255.255.255.224 {
#range 10.5.5.26 10.5.5.30;
#option domain-name-servers ns1.internal.example.org;
#option domain-name “internal.example.org”;
#option routers 10.5.5.1;
#option broadcast-address 10.5.5.31;
#default-lease-time 600;
#max-lease-time 7200;
#}
#Hosts which require special configuration options can be listed in
#host statements. If no address is specified, the address will be
#allocated dynamically (if possible), but the host-specific information
#will still come from the host declaration.
#host passacaglia {
#hardware ethernet 0:0:c0:5d:bd:95;
#filename “vmunix.passacaglia”;
#server-name “toccata.fugue.com”;
#}
#Fixed IP addresses can also be specified for hosts. These addresses
#should not also be listed as being available for dynamic assignment.
#Hosts for which fixed IP addresses have been specified can boot using
#BOOTP or DHCP. Hosts for which no fixed address is specified can only
#be booted with DHCP, unless there is an address range on the subnet
#to which a BOOTP client is connected which has the dynamic-bootp flag
#set.
#hostfantasia {
#hardware ethernet 08:00:07:26:c0:a5;
#fixed-address fantasia.fugue.com;
#}
#You can declare a class of clients and then do address allocation
#based on that. The example below shows a case where all clients
#in a certain class get addresses on the 10.17.224/24 subnet, and all
#other clients get addresses on the 10.0.29/24 subnet.
#class“foo” {
#match if substring (option vendor-class-identifier, 0, 4) = “SUNW”;
#}
#shared-network 224-29 {
#subnet 10.17.224.0 netmask 255.255.255.0 {
#option routers rtr-224.example.org;
#}
#subnet 10.0.29.0 netmask 255.255.255.0 {
#option routers rtr-29.example.org;
#}
#pool {
#allow members of “foo”;
#range 10.17.224.10 10.17.224.250;
#}
#pool {
#deny members of “foo”;
#range 10.0.29.10 10.0.29.230;
#}
#}
From the above file you need to configure bold options and change domain name where it says yourdomainname.com
Finally you have to restart the dhcp service by using the following command
sudo service isc-dhcp-server restart
DHCP server testing
You can check if your dhcp server is working properly bt running the following command
sudo netstat -uap
Orginal Article


